Showing posts with label cooking. Show all posts

Wednesday, February 25, 2015

Tiramisu recipe

We were lucky enough to celebrate Lunar New Year's twice this year. Our friend Jessica invited a group of us church friends over for hotpot.  I offered to bring tiramisu - somehow this has become my signature dish to bring for this group over the years. It's a pretty easy recipe so I'm always happy to oblige when it's requested. While it's not particularly photogenic, it's super delicious!


I've adapted this recipe from allrecipes.com - Jeff particularly likes that it doesn't involve any raw eggs, as he finds raw eggs gross and unhygenic. 

Ingredients
  •  6 egg yolks
  •  3/8 cup white sugar
  •  2/3 cup milk
  •  1 1/4 cups heavy cream
  •  1/2 teaspoon vanilla extract
  •  1/2 pound mascarpone cheese
  •  1 cup strong brewed coffee, room temperature
  •  2 (3 ounce) packages ladyfinger cookies
  •  1/4 cup of unsweetened cocoa powder

Directions
  1. In a medium saucepan, whisk egg yolks and sugar together until well blended. Whisk in milk and cook over medium heat, stirring constantly, until mixture boils. Boil gently for 1 minute, remove from heat and allow to cool slightly. Cover and chill in refrigerator. (The directions says to chill for an hour but I usually don't have the patience to wait more than 20-30 minutes.)
  2. In a medium bowl, beat cream with vanilla until stiff peaks form. 
  3. Split ladyfingers in half lengthwise and drizzle with coffee.
  4. Whisk mascarpone into yolk mixture until smooth.
  5. Arrange half of soaked ladyfingers in bottom of a 7x11 inch dish. Spread half of mascarpone mixture over ladyfingers, then half of whipped cream over that. Repeat layers and sprinkle with cocoa. 
  6. Cover and refrigerate 4 to 6 hours, until set.

Monday, February 23, 2015

New Year's Feasting & A Not-So-Oily Sticky Rice Recipe

This past weekend, we had an amazing Lunar New Year potluck with friends at our house. There were only 6 of us so there were plenty of scrumptious leftovers for everyone to take home. I'm blessed to be friends with such great cooks! I'm probably biased but I honestly believe the food we made (and ate) was just as good, if not better than the food I've had in a lot of restaurants. 

 
Clockwise from top right:

  • oily rice 油飯 (recipe below!)
  • braised pork belly 紅燒肉
  • fermented rice with sticky rice balls 酒釀湯圓 
  • steamed snapper with tofu
  • drunken chicken 醉雞
  • the whole spread in one shot!


For those who are interested, here is an approximate recipe for the "oily rice" (油飯). Even though it's called oily rice, it really isn't very oily at all. It's made with a special sticky rice and is savory and delicious all at once!

Ingredients

Recipe
  1. Soak mushrooms in water for 1-2 hours (or until soft). Save the water and dice the mushrooms.
  2. Cook rice separately in rice cooker (I had to do a little trial and error to figure out the right proportions - may differ by rice cooker).
  3. Dice up the pork chops and marinate the meat in soy sauce and sugar.
  4. Cook dried shrimp in oil and then add mushrooms.
  5. Cook for awhile and add mushroom water when it gets dry.
  6. Add red shallots.
  7. When it starts smelling fragrant, clear out space on pan.
  8. Add oil in cleared space and put meat in.
  9. Cook thoroughly until meat is done.
  10. Add more soy sauce and sugar.
  11. Remove from heat.
  12. Mix meat, mushrooms, shallots, and shrimp with cooked rice.
  13. Adjust taste by adding soy sauce and sugar until the taste and color are right.

Thank goodness for friends and family that make each year even better than the last. Happy Year of the Sheep to all!

Tuesday, February 3, 2015

Super Bowl Sunday

Jeff decided last minute to throw a Super Bowl party - and I was probably one of the last to find out! Despite my need to over-plan everything in advance, we managed just fine with 36 hours notice. It helped that our generous friends brought wings, guac, cookies, and chips. I also had leftover Espresso Chip Angel Food Cake (from Angel Heart Cakes) courtesy of Katie's non-shower the day before, so our food prep was minimal. 

On top of all that, Jeff made chicken satay with peanut sauce and salsa, Sandy and I made caprese salad skewers (a la Piatti's), and Bryan made sangria. Here's the recipe for the chicken satay and peanut sauce:


Chicken
  • 1 tablespoon peanut oil
  • 2 medium cloves garlic, thinly sliced
  • 2 skinless boneless chicken breast halves (8 oz each) sliced into thin 1/2 inch strips
  • 2 teaspoons chopped fresh cilantro
  • red pepper flakes for garnishing
  1. Marinate chicken strips in peanut oil and garlic for about 30 minutes and then grill.  
  2. Sprinkle cilantro and red pepper flakes on top.
Peanut Sauce
  • 1/2 cup of creamy peanut butter
  • 1/3 cup of water
  • 2 tablespoons of soy sauce
  • 2 tablespoons of rice vinegar
  • 1 tablespoon of honey
  • 1 tablespoon Asian sesame oil
  • 1 1/2 teaspoons peeled and grated fresh ginger
  • 1 teaspoon minced garlic
  • pinch of cayenne pepper or dash of chili sauce
  1. Combine all the ingredients in a food processor until smooth. (We do it by hand because we're lazy.)
I don't watch football so I wasn't particularly interested in the outcome of the Super Bowl. I am a marketer so I did find the commercials interesting. If I'm being really honest, it helps to see the reactions of others as they watch commercials so that I can better understand what kind of advertising does and does not work. Yes, I can be a huge nerd sometimes. :)

Plus, it's always fun to get together with friends at home. I guess I've always been a homebody because this has always been the easiest, funnest way for me to hang out with friends. Even during my single days, I was never really into  clubbing or barhopping. I've always preferred staying in with good food and great company - I guess the former is technically optional, if not highly preferable. Luckily I've got great friends that can indulge these preferences!

Wednesday, December 17, 2014

Flan

I always use the holidays as an excuse to make flan. It's not a particularly winter-y type of dessert but given that this time of the year is filled with large social gatherings, it's always a good time for my favorite dessert. I've adapted the recipe from a cookbook I bought Jeff many years ago, and it's served us well ever since! This recipe makes 8 servings.

Caramel 
  • 1/3 cup water
  • 1 cup of sugar
  • 2 tablespoons light corn syrup
  • 1/4 teaspoon lemon juice
  1. Combine everything in a light-colored pan and heat over the stove on medium-high heat. This process will take about 8 minutes – the mixture will start to turn colors and you will wonder if it’s done yet, even though the color is not quite golden. It’s not! You’ll know when the color is right.
  2. Keep swirling the pan until you get that color change. Once it turns that honey-caramel color, remove the pan from heat and distribute caramel into ramekins. The book says to keep it heated for another 4-5 minutes after the color change but I did that and it started burning after a minute so I would recommend removing it almost immediately.
Custard
  • 1 1/2 cups milk (The recipe stipulates whole, I’m a rebel so I use 1%.)
  • 1 1/2 cups light cream
  • 3 large eggs plus 2 large yolks
  • 1/3 cup sugar (The recipe stipulates 2/3 cup sugar…again, I’m a rebel so I cut it in half. I feel like 1/3 cup is plenty sweet, especially with the caramel, but you can adjust this to your preference.)
  • 1 1/2 teaspoons vanilla extract
  • Pinch salt
  1. Preheat oven to 350 degrees.
  2. Heat milk and cream over medium heat, stirring occasionally, until steam appears. You don’t have to heat it until it’s boiling. Once it’s finished, remove from heat.
  3. Whisk the eggs, yolk, sugar, vanilla, and salt in a large bowl until just combined.
  4. Gently whisk the warm milk into the eggs.
  5. Strain the mixture through a fine-mesh sieve – this part is particularly important to me and I actually strain it a few times, just to make sure the mixture is smooth and clump free.
  6. Bring 2 quarters of water to a boil. Fold a dish towel to fit the bottom of a large baking dish or roasting pan and position it in the pan.
  7. Divide custard mixture among the ramekins and place them on the towel in the pan.
  8. Fill the pan with boiling water to reach halfway up the sides of the ramekins; cover the entire pan loosely with aluminum foil so steam can escape.
  9. Bake until a paring knife inserted halfway comes out clean. The book says it’s about 35-40 minutes but I have found that it’s closer to 45 minutes. It might just be my oven though.
Once it's ready, loosen the edges with a ramekin, flip it over onto a plate, and serve!


Sunday, December 14, 2014

White Elephant Exchange

Here's the loot that we scored from the gift exchange we went to on Friday!

Jeff loves the selfie stick he got - he started using it immediately to take pictures of the festivities. 


I got this awesome cake pop and donut hole maker. My first thought was that I could use this to make Hong Kong egg puffs. Elsa improvised by making a waffle batter from scratch. While it didn't taste exactly like the HK egg puffs, it was delicious. 


Not bad for our first batch! I promised I would learn how to make a chocolate version for our group. They are hoping I'll learn how to make all the creative cake pops - I told them not to hold their breath. :)


We ended up bringing the iPhone portable battery and bluetooth portable speaker. I'm happy to report that the gifts we brought were well-received - the portable battery even got stolen once!

Monday, December 1, 2014

Thanksgiving weekend eats in LA

Whenever I visit LA, my priority is spending time with family and friends - but food definitely comes in at a very close second! Luckily, we can have our cake and eat it too (figuratively and literally) by enjoying delicious cuisine with our loved ones.

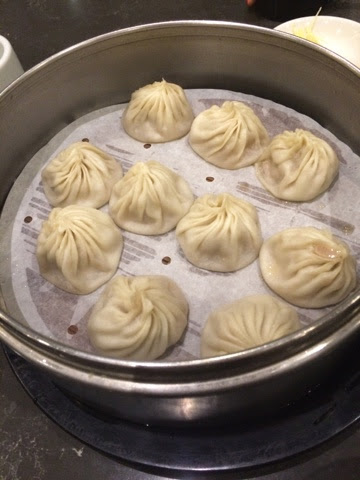
It's becoming a tradition for us to eat Ding Tai Fung with Christina during the holidays. While the Taiwan locations will always taste more authentic and delicious, this one is still a yummy and viable alternative. We prefer the Glendale one because it's located by the Americana so we can shop while we wait. They also let you track the wait time with a nifty app that will text you when your table is almost ready. While the pork soup dumplings (below) are a must, I would also highly recommend the noodles with sesame sauce (not pictured).


No trip to LA is complete without a visit to an all you can eat Korean BBQ. We went to OO-KOOK in San Gabriel - the service was particularly fast and friendly this time. I love that OO-KOOK is generous with the rice paper (lower left corner below) because some restaurants are quite stingy about it for some reason. I focused most of my energy and stomach space on the different types of kalbi, all of which were tender and flavorful. 


While we ate out quite a bit, we stayed in for Thanksgiving dinner. I didn't want to trouble my sister-in-law into cooking a huge Thanksgiving meal, so we opted for Taiwanese style hotpot instead. I always load up on silken tofu and fish balls filled with cod roe.


The next morning, my brother made us all delicious gluten-filled waffles (he experimented with a few gluten-free mixes that didn't quite work out). This is one of the first meals he has cooked for me in at least 3-4 years, if not longer, so I had to document this momentous occasion! I added the berries myself. ;) 

Tuesday, November 18, 2014

Blueberry mochi muffins

I started looking for a mochi cake recipe last year and stumbled upon this version on Week of Menus, a blog filled lots of awesome recipes. The mochi cake was super easy to make and well-received by our dinner guests. Friends raved about how delicious it was - especially the chewy corners and edges. Their comments motivated me to buy a mini muffin pan so that each serving of mochi cake would be covered in the edgy goodness. 

Here's the recipe I used from Week of Menus, with a few tweaks:
(makes 24 mini muffins)

1 1/2 cups (or 1/2 pound) of mochiko flour 
1 teaspoons of baking powder
1 dash of salt
5/8 cup of sugar (I never use more than half the amount of sugar stipulated in any recipe - I hate when desserts are too sweet)
1 13.5 oz can of coconut milk (I use the lowest fat version I can find at the Asian market)
2 large eggs
2 tablespoons of butter 
1/2 teaspoon of vanilla extract
6 oz of blueberries

1. Preheat the oven to 350 degrees and spray the muffin pan with a non-stick oil spray.
2. Whisk the mochiko flour, baking powder, salt, and sugar together.
3. In a separate bowl, melt the butter and combine with eggs, coconut milk, and vanilla extract.
4. Combine the ingredients in a large bowl. Mix until the mixture is smooth.
5. Spoon the batter into the muffin tin.
6. Add 2 blueberries per muffin.
7. Bake for approximately 40 minutes until the edges are golden brown.

I am a terrible baker so I don't believe in allowing desserts to cool for more than a few minutes - I'm just too impatient for that. Plus, I love how delicious things taste straight out of the oven. The mini muffin version is even better than the original!


Thursday, November 13, 2014

Spicy Wontons (紅油抄手)

I love spicy wontons (紅油抄手) but I have yet to find a really great rendition of them here in the Bay Area. Taikee Wonton in North San Jose has pretty good regular wontons but they don't make spicy wontons the way I like them. Luckily, I've learned to make a pretty decent rendition of these wontons via trial and error after watching my aunt in the kitchen for years. The recipe is fairly approximate, so do adjust the ingredients and flavoring to your personal taste. 

Wonton ingredients
  • 1 pound of ground pork
  • 3 tablespoons of soy sauce
  • 3-4 pinches of white pepper
  • 1-2 teaspoons of sesame oil
  • 1/8 cup of chicken broth 
  • 20-30 wonton wrappers (I have yet to figure out the right amount of pork for exactly one pack of wonton wrappers)
1. Mix wonton ingredients together in a large bowl (except for the wrappers). Add water until the consistency is soft but not too watery (approximately 1/8 cup of water).

2. Put 1-2 teaspoons of filling per wonton wrapper. Seal the wonton any way you prefer. I copy my aunt's method of scrunching them up in one hand, but I don't do it as well as she does - sometimes mine fall apart as the meat escapes the wrapper, while hers always stay perfectly intact.

3. Boil wontons in a large pot of water. After wontons have been floating for a few minutes, remove from pot and into a large bowl.

Spicy sauce
  • 2-3 cloves of minced garlic
  • 2-3 tablespoons of soy sauce
  • 1 teaspoon of sugar
  • 1-2 teaspoons of Chinese chili garlic sauce (For many years, I used the Lee Kum Kee brand but I've recently switched to Ning Chi to up the spice factor.)
  • 2 teaspoons of black vinegar
  • 2-3 pinches of black pepper
1. Pour sauce over the wontons. Garnish with green onions if you wish. Enjoy!